

Resource Type: Success Kit

Accruals success kit

Accruals are estimates for unbilled work that can be collected from vendors to anticipate fees and expenses for the reporting period. Please review this page to learn more about how to set up and start collecting and reporting on accruals. 

Key considerations before accruals setup:

1. Would you like the vendors to provide accruals estimates separately for each matter? If not, they will be asked for a lump accrual sum.

  • Pros: More detailed accrual reporting
  • Cons: Vendors may be doing work for matters not yet in Unity
  • Recommendation: By Matter

2. When a Vendor is submitting their Accruals, would you like to include a “previous month” bucket as part of the period? 

  • Pros: Ability to collect prior accruals
  • Cons: This total amount cannot be moved into existing matters. The lump sum for the previous month will remain outside of the existing period in an “other” bucket.
  • Recommendation: Do not include previous months 

3. When submitting accruals, would you like your Vendors to include accrual totals for forward months? If so, how many forward months? 

  • Pros: Good option if you process accruals on a quarterly basis.
  • Cons: Estimates will be less accurate when you accrue months in advance.
  • Recommendation: Do not allow forward months unless this was requested by your Finance or AP teams.

4. Would you like any budgets associated with a Vendor to be shown in the accruals screen when a vendor submit accruals?

  • Pros: Increased visibility of approved budgets
  • Cons: May encourage vendors to hut budget when otherwise not necessary
  • Recommendation: Do not show associated budgets

5. Would you like to include an “Other” option on your accrual forms?

  • Pros: Allows vendors to submit amounts for not yet available matters
  • Cons: This total amount cannot be moved into existing matters. The lump sum for the “Other” will remain outside of the existing period.
  • Recommendation: Do not allow ‘Other’ accrual submissions.

6. Would your team like the ability to manually trigger the Accrual notification emails? 

  • Pros: Can request accruals outside of the normal schedule 
  • Cons: None
  • Recommendation: Allow manual accrual requests.

Accrual reports

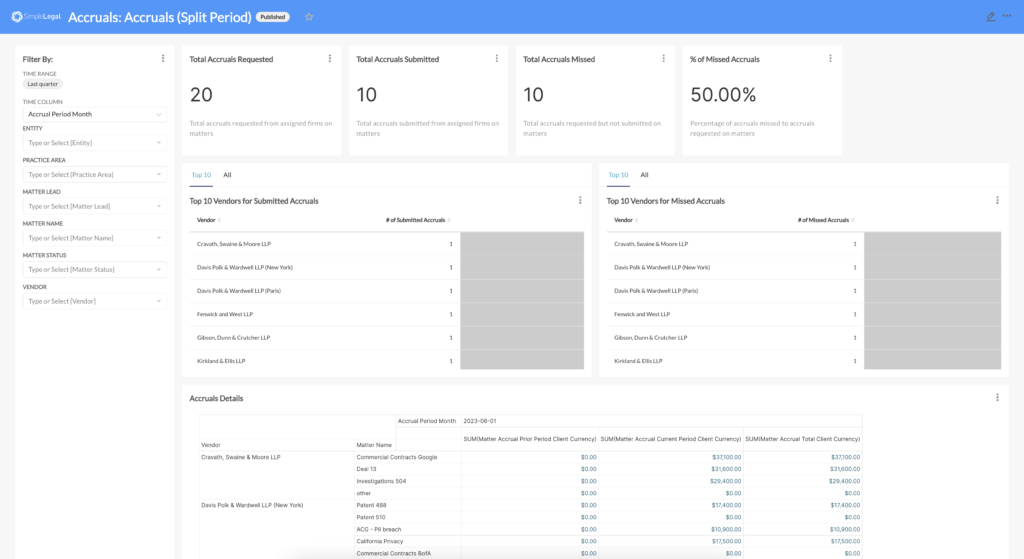
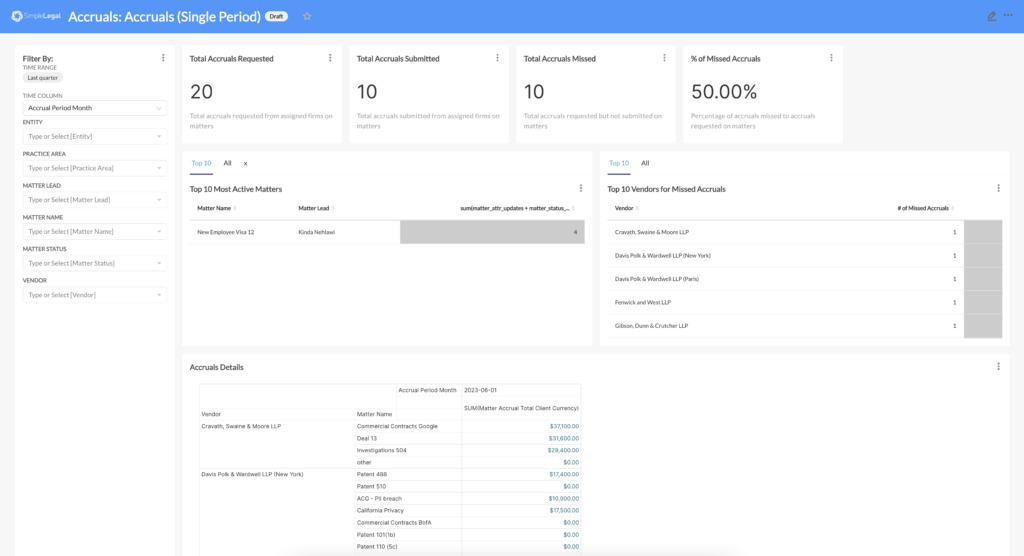
Accruals (single period)

Showcases metrics and detailed information about accruals for single (current) period requests and submissions from vendors.

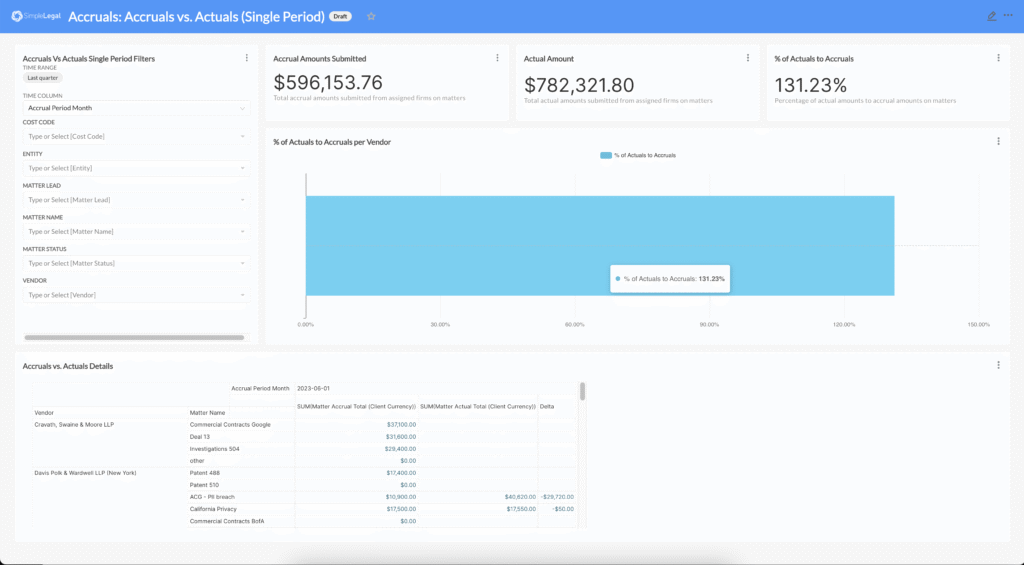
Accruals vs. actuals (single period)

Showcases metrics and detailed information about accruals for single (current) period submissions from vendors compared to actual spend.

Accruals (split period)

Showcases metrics and detailed information about accruals for split (prior and current) period requests and submissions from vendors.

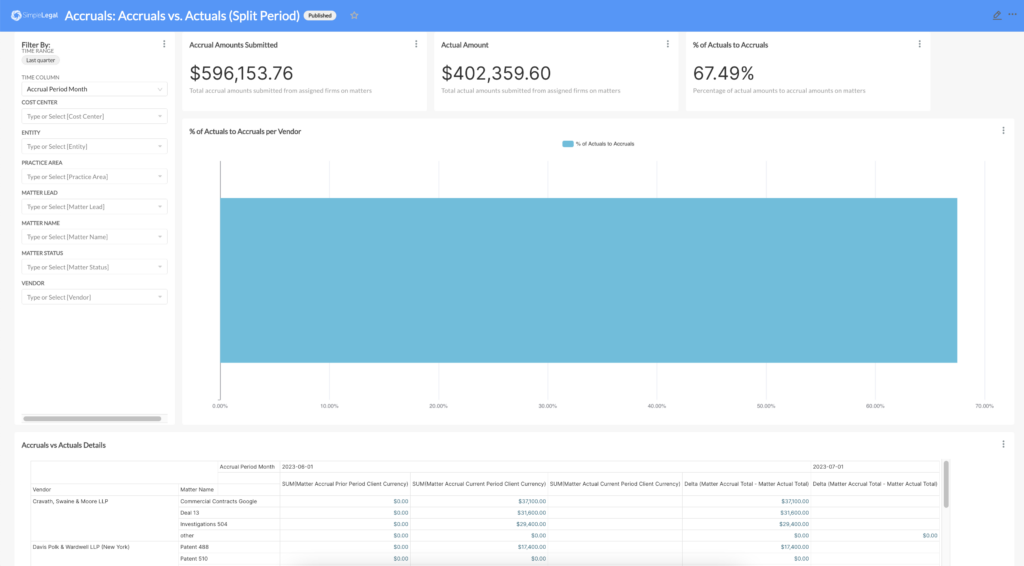
Accruals vs. actuals (split period)

Showcases metrics and detailed information about accruals for split (prior and current) period submissions from vendors compared to actual spend.

Accruals FAQs

Are Submitted but unapproved invoices included in reporting?

Submitted but unapproved invoices are not included in reporting. 

We see accruals truly as unbilled estimates. Since the received invoices have been billed, we do not include them. If your accruals process includes received but not fully approved invoices, you will need to combine two reports together to get your totals. 

Can we only send a single request?

No, but if the vendor responds to the first request, we will not send out any further reminders. If they do not provide their estimates, we will send up to two reminders.

When does the accrual period end?

This is two parts. The first part is when the accruals form expires, which is controlled in the custom settings. This, however, can be extended out manually for a single vendor, or for all vendors. The period truly ends once the requests are sent out for the following period/month. 

What currency are accruals submitted in?

The vendor has the ability to select any currency when submitting, but the currency they choose is for all matters – they can not detail currency by matter. We recommend that vendors submit in the same currency as their invoices are submitted. 

Unity Change Management: New e-Billing System

What is “Change Management?”

Change management is the process of preparing your legal and surrounding teams for the addition of Unity into your company’s process. It is a critical step in ensuring the proper onboarding of the software and building long-term acceptance of the new system.

Why is Change Management Important?

Successful adoption of a new tool or process sets the stage for how your organization will co-exist with Unity. Change management prepares your team for the “why” and “what” of implementation: why are you bringing on Unity and what problems are you solving by the addition of Unity? If your team understands these two items, the implementation of Unity becomes a goal for the entire organization to work towards.

How to Prepare Your Team

  • Communication is key! Provide expected delivery dates, system expectations, and training opportunities early and often. If necessary, Unity has communication templates available to assist with starting these conversations. View the Unity Implementation Communications Library and select the “Unity Onboarding, New ELM System” template.
  • Do you have team members who need extra assistance or are hesitant of a SaaS solution? Provide a list of resources for asking questions during implementation and opportunities to showcase the tool in action. Early exposure lessens the uncertainty of your team members.
  • Your Unity system will change. As your team grows and evolves, your Unity system will as well. Providing assurances to your team that Unity does not need to function as it does at go-live, nor should it, they can provide insight, feedback, and suggestions as they use the tool. More importantly, allow Unity to mature alongside your needs.

Implementation Recommendation Tips and Tricks

  • Tell your team why you’ve decided to add Unity to your legal team! What problems are you trying to solve and what are you hoping to get out of the new product?
  • Provide updates and your progress. Your team will be more responsive to onboarding a new system if they understand the work that is happening to assist them in the future. Updates and progress reports, even milestones you have accomplished, will build excitement for the coming launch.
  • Give your team ample time to learn about the tool and opportunities to ask questions (e.g. training, documentation) and provide feedback to your implementation team with scheduled Q&A sessions or an inbox to send suggestions.

Is your team migrating from one e-billing system to another? Check out our Migrating e-Billing Systems Change Management details!

Unity Change Management: Migrating e-Billing Systems

What is “Change Management?”

Change management is the process of preparing your legal and surrounding teams for the swap from an existing Legal Ops e-Billing tool to Unity. It is a critical step in ensuring the proper onboarding of the software and building long-term acceptance of the new system.

Why is Change Management Important?

Successful adoption of a new tool or process sets the stage for how your organization will co-exist with Unity. Change management prepares your team for the “why” and “what” of migrating from one system to another. The most important question to answer for your team is: what problems are you solving by migrating to Unity? If your team understands this, the implementation of Unity becomes a goal for the entire organization to work towards.

How to Prepare Your Team

  • Communication is key! Provide delivery dates, why your team is making this switch, and training opportunities early and often. If necessary, Unity has communication templates available to assist with starting these conversations. View the Unity Implementation Communications Library and select the “Unity Onboarding, Migrating ELM Systems” template.
  • Do you have team members who could be resistant to change or need extra assistance? Provide opportunities to explain why this change is occurring, what the benefits are the change, and resources for asking questions during implementation and after launching Unity. Early exposure lessens the uncertainty of your team members.
  • Your Unity system does not need to match your existing workflow. Your team is making a conscious decision to bring on a new system, ensure that you are not bringing over old processes or data “just because” it was in your old system if it no longer supports your workflows.

Implementation Recommendation Tips and Tricks

  • Tell your team why you’ve decided to switch to Unity to your legal team! What problems are you trying to solve and what are you excited or eager to implement with this new system? Your excitement will help your team get on board.
  • Take some time to review your existing data (e.g. matters, vendors, etc) to see what data is working and, more importantly, what is no longer working for your team. Does all data need to be brought over? Should anything be cleaned up or organized in a more meaningful way?

Is your team onboarding a new e-billing system for the first time? Check out our New e-Billing System Change Management details!

Unity Activation Success Kit

What is “Unity?”

The AI-Native Legal Solution for Seamless End-to-End Legal Operations

Unity is an AI-native legal operations framework that empowers legal teams with automation, analytics and strategic control over legal spend, compliance, contracts, and risk.

How Does Unity Differ from SimpleLegal?

Unity builds on the same trusted foundation as SimpleLegal—your core matter management, e-billing, vendor collaboration, and spend management functionality remains intact. The workflows and capabilities your team relies on today continue to exist within the Unity framework.

What’s new is the platform’s AI-native architecture and expanded functionality. Unity is designed to support intelligent automation, enhanced insights, and ongoing innovation—enabling new features and capabilities that were not previously available in SimpleLegal. In short, Unity preserves what works today while unlocking the ability to scale, automate, and evolve your legal operations for the future.

What is “Activation”?

As you expand your use of Onit with Unity, Activation marks the beginning of a seamless next phase—designed to align with your team’s evolving needs and future growth. Unity is Onit’s AI-native legal operations suite, unifying matter management, e-billing, vendor collaboration, and spend oversight into one scalable platform built for the future of enterprise legal.

Activation to the Unity Framework jump-starts your transition to AI-native Enterprise Legal Management (ELM) by embedding industry best-practice configurations from day one—so you can spend less time planning and more time delivering value. Rather than a system migration, Activation is a seamless upgrade of your existing SimpleLegal environment to the new Unity framework, providing a proven foundation while preserving the flexibility to customize and scale as your needs evolve.

What is the activation process?

The Activation process is designed to give your team time, visibility, and support as you transition to Unity—without disrupting your current workflows.

Step 1: Access to Your Unity Sandbox

Your team will first receive access to a dedicated Unity sandbox environment. This sandbox is a copy of your existing SimpleLegal configuration, set up in a separate system so you can safely explore, test, and become familiar with the Unity experience. Your SimpleLegal administrative users will receive an email from Onit with a link to your organization’s unique Unity sandbox URL

Step 2: Sandbox Exploration Period

You’ll have a defined exploration window to navigate Unity, review configurations, and prepare your team for the transition. Details about your sandbox access timeframe will be communicated directly to your administrative users via email. If you’re unsure of your timeline, please reach out to your Customer Success Manager or Account Manager. Change management and training materials are also available in this Success Kit to support onboarding and internal enablement.

Step 3: Activation of Unity Production

Once your sandbox exploration period concludes, your Unity Production environment will be activated. This environment is connected to your existing SimpleLegal production instance, allowing your team to work in both systems if needed while onboarding to the new Unity interface. This ensures continuity and flexibility during the transition.

Step 4: SimpleLegal Sunset

At the end of the transition period, your SimpleLegal production environment will move to the new Unity UI. The transition date will be communicated to your administrative users via email. Once the transition is complete, your team will begin working fully in the Unity Production environment moving forward.

What Happens to CounselGO?

There are no changes to CounselGO as part of Activation. Your vendors will continue to submit invoices and collaborate through CounselGO in the same way they do today. There is no disruption to the vendor experience, no new submission process, and no additional action required from your firms. Activation to Unity does not impact how invoices are submitted or processed through CounselGO.

What Is Required from SimpleLegal Users?

To ensure a smooth and successful transition to Unity, we ask that your team take a few key steps during the Activation process:

1. Review Activation Materials

Carefully read through all Activation communications and resources provided to your administrative users, as well as the materials included in this Success Kit. These resources outline important timelines, expectations, and guidance for the transition.

2. Communicate Early with Your Team

Notify your broader team about the upcoming transition as early as possible. Proactive communication helps set expectations and minimizes disruption. A change management communication template is included below for your convenience.

3. Share Training Resources

While the Unity interface is intuitive and designed to feel familiar, we strongly recommend sharing the available training materials and resources with your team. Preparing users in advance will help ensure confidence and continuity once Unity Production is live.

4. Reach Out with Questions

If you have any questions or need additional support at any point during Activation, please contact our Support team, your Customer Success Manager, or your Account Manager. We’re here to help make this transition seamless.

5. No Technical Set up Required

You do not need to take any technical action for Activation to occur. On your scheduled Activation date, your system will automatically transition to Unity, and Onit will manage the move behind the scenes to ensure a smooth and seamless experience. Your Activation date and new Unity URL will be communicated directly to your administrative users in advance so your team knows exactly what to expect. Until then, you can continue working as usual.

Product Training and Enablement

To help your team prepare for the transition, we recommend sharing the Unity training resources in advance. These cover the updated interface, key navigation changes, and tips for getting started. 

Unity Quick Start Guide
Navigating Unity ELM
Accessing Unity ELM
Ask Unity User Guide

Email Whitelisting Guidance

To ensure you receive all Activation and Unity-related communications, please ask your IT or email administrator to safelist or whitelisting the onit.com domain. We recommend whitelisting the following:

[email protected]
[email protected]
[email protected]
and [email protected]

Unity & SimpleLegal Implementation Communications Guide

Communication is critical to a successful activation. To best support your internal teams and vendors during the rollout of Unity, below is a template designed to guide awareness, adoption, and readiness.

This  template is intended to be flexible starting points. You are encouraged to tailor the language, timing, and details to reflect your organization’s voice and internal process. Clear, consistent communication will help ensure a smooth transition, minimize confusion, and set expectations ahead of go-live.

How to Use the Template

  1. Identify the appropriate template(s) based on your audience (internal teams or vendors).
  2. Copy and paste the selected email template into your preferred email system.
  3. Populate any placeholder fields (e.g., [COMPANY], [go-live date], [project sponsor]) and adjust the content as needed.
  4. Review the recipient list indicated in the To field and send the email using your preferred email system.
  5. Best practice: When sending to a large distribution list, send the email to yourself and Bcc all recipients.

Internal Team Email Template

From: Client SimpleLegal Administrator or Project Sponsor

To: Internal Legal Team / Relevant Stakeholders

Subject: [COMPANY] Introducing Unity: Our New Legal Operations Environment

Body:

[COMPANY] is upgrading our SimpleLegal to Unity. Unity will serve as our central hub for legal work and will help streamline how we manage matters, vendors, invoices, and legal spend while improving visibility and consistency across the team.

Unity brings together our legal operations processes into a single, connected experience. This upgrade supports [COMPANY]’s goals around efficiency, standardization, and improved insight into legal activity and spend.

With Unity, internal team members will be able to:
– Create and manage legal matters, accessed through the Unity environment
– Assign matters to approved vendors for billing and collaboration
– Review invoices submitted by vendors and law firms through the Unity vendor portal, CounselGO (LEDES and PDF formats)
– Apply [COMPANY]’s approval workflows and billing rules automatically
– Ensure approved invoices are processed directly to Accounts Payable
– Report on legal matter and spend data from a single source of truth

Unity is slated to go live in [month of designated go-live date]. Ahead of go-live, to prepare for the transition, below are the necessary training sessions. These cover the updated interface, key navigation changes, and tips for getting started.

If you have any questions about Unity or the new legal operations process, please reach out to [client implementation lead or project sponsor].

Updated Subprocessors for Unity

 As part of the Unity platform and its AI-powered capabilities, new subprocessors are used to support Spend Agent and Unity e-Billing functionality. These subprocessors are listed in Table 3 on Onit’s Sub-processors page: https://www.onit.com/sub-processors/

Unity includes AI-powered features, and the applicable terms are outlined in Sections 4.6 and 12 of the Terms of Service, as well as in the Product Terms for Spend Agent and Unity e-Billing.

For the most up-to-date information, please refer to the official sub-processors page linked above. If you have any questions about the additional sub processors or the use AI, please reach out to your CSM.

Ask Unity

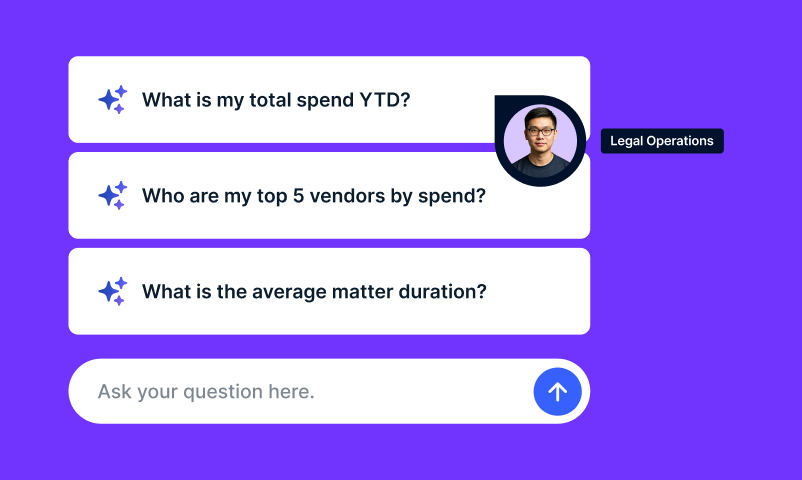
Ask Unity is an AI‑powered, conversational analytics experience embedded within the Unity SaaS application that allows authorized users to query and analyze legal operations data using plain English questions. Through a full page chatbot, users can ask questions such as “What is my total legal spend last year?” and receive structured, data backed responses, including summaries, tables, and visualizations sourced directly from Unity’s data warehouse. Ask Unity uses a large language model (LLM) in an agentic workflow, is constrained to supported data and defined behaviors, and inherits Unity’s role-based access controls (RBAC) to ensure users only see data they are authorized to access.

Commonly Asked Questions (Q&A)

Q: What makes Unity different from heritage Onit interfaces?
A: Unity introduces an AI-native, modern UI that unifies all Onit solutions—such as SimpleLegal, ContractWorks, ReadySign, CounselGO, and more—into a cohesive, scalable framework. This technical foundation allows us to continuously adapt, enhance, and update our solutions with greater speed and consistency across platforms.

Q: How does Onit ensure I’m not just activated, but adopted successfully?
A: Onit’s success model includes continuous Customer Success engagement, community programs, customer advisory boards, roundtables, and feedback loops under the OnitCX umbrella.

Q: How can I extend Unity to meet unique workflow needs?
A: Use Unity’s Workflow App Studio for out-of-the-box workflows or build custom automations with no code. Enhance operations further using AI Agent Studio.

Q: Where do I find training materials and release updates?
A: Head to the Resource Center. Stay informed via Onit’s blog and newsroom.

Q: What is Spend Agent, and why does it matter?
A: Spend Agent is an AI-native invoice review tool embedded in Unity. It automatically validates invoices against your guidelines, offers explainable AI feedback, speeds approvals, and strengthens vendor relations.

Q: Will my current SSO still work or be available in Unity?
A: Before activation, all SSO access points (including your SSO portal, SimpleLegal URLs, and email links) will direct users to SimpleLegal production. After activation, those same entry points will instead route users to Unity production, except when accessing via a SimpleLegal production URL, which will continue to log users into SimpleLegal.

Q: What are prompting best practices for Ask Unity?
A: Our team tested Ask Unity extensively and compiled our best practices and recommendations for Ask Unity here.

Q: How is Ask Unity using my data and do you have more information on your AI usage policies?
A: Ask Unity uses a large language model (LLM) to support data and defined behaviors through trained interaction, and it inherits Unity’s role-based access controls (RBAC) to ensure users only see data they are authorized to access. For more information on AI Usage – read here.

Task Management Success Kit

Transform your department’s efficiency with Unity’s integrated task management! Our solution streamlines the way matters are worked and completed, minimizing errors and missed deadlines. Unlock your team’s potential and accomplish more with ease!

Resources

Learn more about task management and how to utilize the features!

Need more help?

We hope this success kit was useful and provided you with helpful information about SimpleLegal’s task management. If you have any further questions, please contact your CSM.

Unity API Toolkit

Welcome to Unity’s API Toolkit! You’ll find important information and links about our API to help you and your team get the most out of Unity. 

Have questions or need help? Please contact [email protected] for assistance.

Introduction

Purpose of the API Toolkit

At a high level, the Unity API allows the customer to request approved invoices from Unity and Unity API provides that data back. The customer then updates the invoice status to “Sent to AP” in Unity. Once the invoice is paid, the Customer updates invoice status to “Paid” and provides payment details (optional) in Unity.

On a technical level, the Unity API is organized around REST. Our API has predictable, resource-oriented URLs, and uses HTTP response codes to indicate API errors. We use built-in HTTP features, like HTTP authentication and HTTP verbs, which are understood by off-the-shelf HTTP clients. We support cross-origin resource sharing, allowing you to interact securely with our API from a client-side web application (though you should never expose your secret API key in any public website’s client-side code). JSON is returned by all API responses, including errors.

Our formal documentation at developer.simplelegal.com uses PATCH methods throughout, however, POST can be used instead of PATCH to accommodate systems that can’t utilize the PATCH method.

How to use the API Toolkit

Step 1 / Customer

Send your IT team or IT consultant the link to our API development page. This provides all the details of building an API to Unity.

Step 2 / Customer

Confirm which business process/workflow steps will be needed for your integration, for example for finance integration:

  • Required: Retrieve Invoices to be paid
  • Optional: Retrieve Unity PDF copy
  • Optional: ACK/Payment confirmation
    • Record payment information
    • Update invoice status to Paid

Step 3 / Customer

Reach out to your Finance team to understand accounting and data requirements to post invoices into your finance system and pay an invoice.

Step 4 / Customer & Unity

Discuss attributes/data that needs to be in Unity for payment (see FAQ below: “What are the most common attributes and their definition?”)

Step 5 / Unity

Configure Unity with required attributes

Step 6 / Unity

Provide customer with Unity base URL and API Authorization token. Will be in the following format:

  • API base URL: https://<>.simplelegal.com
    • e.g. http://app.simplelegal.com or http://abccompany.simplelegal.com
  • API Authorization Token: <auth_token>

Step 7 / Customer

Test connection to Unity API

Step 8 / Customer

Build necessary integration calls and configuration based on integration needs

Step 9 / Customer & Unity

Test your connection by calling an endpoint and make sure you were able to retrieve data, and the relevant information is generated. For example, for finance integration, you should approve an invoice in Unity and make sure it can be retrieved, with the necessary information sent back to Unity.

Getting Started

The Unity API is organized around REST. Our API has predictable, resource-oriented URLs, and uses HTTP response codes to indicate API errors. We use built-in HTTP features, like HTTP authentication and HTTP verbs, which are understood by off-the-shelf HTTP clients. We support cross-origin resource sharing, allowing you to interact securely with our API from a client-side web application (though you should never expose your secret API key in any public website’s client-side code). JSON is returned by all API responses, including errors. We’ve documented PATCH methods throughout, however, POST can be used instead of PATCH to accommodate systems that can’t utilize the PATCH method.

Prerequisites

  • Determine API user details (first name, last name, email)
    • Typically, the API user has a generic name (e.g. first name: Oracle Integration, last name: Finance Integration, email: [email protected])
  • Provide API user details to Unity
  • Unity to generate API key
  • Unity to provide Unity API toolkit & API developer
  • Schedule and conduct API requirements and mapping (Client and Unity)
  • Schedule and conduct API development (Client)
  • Testing (Client and Unity)

Authentication

API authentication is a combination of technology and process that proves or verifies the identities of users who want access to an API. Specifically, API authentication involves the use of a software protocol to verify that users are who they claim to be when a client makes an API call.

Sandbox vs Production

Our sandbox APIs emulate the live environment and give you the opportunity to send test API calls and to receive a simulated response. Sandbox APIs are perfect for working with the client before the production API is available, allowing front-end progress to continue, even though there’s no real data or database backing it yet. The production APIs work with our live systems and data. Your application will run in this environment after you go live.

The Multi-tenant Sandbox data is refreshed monthly on the third Friday of the month. Your team can create or update data in the sandbox, and any alterations made will be reset and replaced with the data from the production environment during the monthly refresh.

API Basics

Understanding RESTful APIs

The basic function of a RESTful API is the same as browsing the internet. The client contacts the server by using the API when it requires a resource. API developers explain how the client should use the REST API in the server application API documentation. These are the general steps for any REST API call:

  • The client sends a request to the server. The client follows the API documentation to format the request in a way that the server understands.
  • The server authenticates the client and confirms that the client has the right to make that request.
  • The server receives the request and processes it internally.
  • The server returns a response to the client. The response contains information that tells the client whether the request was successful. The response also includes any information that the client requested.

The REST API request and response details vary slightly depending on how the API developers design the API.

HTTP Methods (GET, POST, PATCH)

The HTTP verbs comprise a major portion of our “uniform interface” constraint and provide us the action counterpart to the noun-based resource. The primary or most-commonly-used HTTP verbs (or methods, as they are properly called) are POST, GET, PUT, PATCH, and DELETE. These correspond to create, read, update, and delete (or CRUD) operations, respectively. There are a number of other verbs, too, but are utilized less frequently. Of those less-frequent methods, OPTIONS and HEAD are used more often than others.

Below is a table of recommended return values of the primary HTTP methods in combination with the resource URIs

Call / TypeEntire CollectionSpecific Item
POST / Create201 (Created), ‘Location’ header with link to /customers/{id} containing new ID.404 (Not Found), 409 (Conflict) if resource already exists.
GET / Read200 (OK), list of customers. Use pagination, sorting and filtering to navigate big lists. 
PUT / Update/Replace405 (Method Not Allowed), unless you want to update/replace every resource in the entire collection.200 (OK) or 204 (No Content). 404 (Not Found), if ID not found or invalid.
PATCH / Update/Modify405 (Method Not Allowed), unless you want to modify the collection itself.200 (OK) or 204 (No Content). 404 (Not Found), if ID not found or invalid.
Delete / Delete405 (Method Not Allowed), unless you want to delete the whole collection—not often desirable.200 (OK). 404 (Not Found), if ID not found or invalid.

API Endpoints

In summary, an API endpoint is a specific location within an API that accepts requests and sends back responses. It’s a way for different systems and applications to communicate with each other, by sending and receiving information and instructions via the endpoint.

Response Formats (JSON, XML)

JSON supports numbers, objects, strings, and Boolean arrays. XML supports all JSON data types and additional types like Boolean, dates, images, and namespaces. JSON has smaller file sizes and faster data transmission. XML tag structure is more complex to write and read and results in bulky files.

JavaScript Object Notation (JSON) is a standard text-based format for representing structured data based on JavaScript object syntax. It is commonly used for transmitting data in web applications (e.g., sending some data from the server to the client, so it can be displayed on a web page, or vice versa)

An XML response message is sent by the SDS XML provisioning client in response to an XML request. Each response message consists of a 4-byte binary length value, followed by the XML response in ASCII characters. The length value contains the number of bytes in the XML response, excluding the 4-bytes for the length.

API Calls

An API call allows one application to request data or services from another application. Our API developer page is a comprehensive API document, containing all available API calls, their respective arguments, filters, and examples.

Request Parameters

API request parameters are options that can be passed with the endpoint to influence the response. Refer to request parameters located in the API developer page.

Response Structure

When you send a REST request, the appliance responds with a structured response in JSON format. The exact structure of the response depends on the resource and URI of the request, but all responses are similar. The response includes all available resources from any point within the API.

Common Workflows

API workflows are server-side workflows that you can schedule/trigger in your application and/or expose to be triggered from an external application or system through an API request.

Below are the most commonly requested calls for typical integration scenarios:

Finance Integration (Unity <> AP System)

Step 1: Retrieve all approved invoices

The first step is to fetch all approved invoices. This can be achieved with the invoices end point, filtering on Approved status. Refer to “What are the valid invoice statuses in Unity?” in the Q&A section for other supported statues.

View API Documenter for GET List All Invoices details.

Optional – Retrieve Unity PDF copy

If necessary to your integration, pull the PDF copy of the invoice (either summary or the full pdf). Retrieving the PDF is done on a per invoice basis, so a valid Invoice ID is required. Please note the PDF is base64 encoded so would require a decoder to view.

View API Documenter for GET Retrieve an Invoice Detail PDF and GET Retrieve an Invoice Summary PDF details.

Optional – Retrieve additional details

If necessary to your integration, pull additional details from the matter, vendor, or accounting fields:

Step 2: Update invoice status

After retrieving the invoices, best practice is to record the invoice id, and update all invoices that are to be processed to Sent to AP status. This way, application users, and vendors will see that invoices have been submitted for payment. Optionally, you can use Posted to AP – the flow is dependent on your organizational needs.

View API Documenter for PATCH Update an Invoice details.

Optional – Record acknowledgement of successful invoice posting

After successful posting of invoices, best practice is to record the invoice id, and update all invoices that are to be processed to Posted to AP status. This way users will see that invoices have been successfully posted without error. 

View API Documenter for PATCH Update an Invoice details.

Optional – Record Payment Details

Once payments are made to Vendors, two separate calls will be made for each invoice:

1. Record payment information for an invoice.

Create a Payment record on the individual Invoice endpoint. The required fields are payment_method (which can be defined by your organization; example: check, wire, ach, etc.), amount, currency, and payment date in YYYY-MM- DD format.

View API Documenter for POST Create Payment for an Invoice details.

2. Update Invoice Status

After paying / submitting payment for invoices, you should update the invoice status to Paid. This way, application users, and vendors will see that invoices have been marked Paid.

View API Documenter for PATCH Update an Invoice details.

Matter Integration (Unity <> Matter Management System)

Step 1: List All Matters

The first step is to fetch a list of all matters. The matters are returned sorted by matter name alphabetically. Available modifiers can be added onto the end of a search string joined by a double dash and are generally shorthands for more advanced searches that can be done:

  • lt -> less than
  • lte -> less than equal to
  • gt -> greater than
  • gt -> greater than equal to
  • icontains -> contains, case insensitive

View API Documenter for GET List All Matters details.

Step 2: Create New Matters

First, compare the list of new matters against the existing list of matters from Step 1 to ensure no duplicate matters are created. For additional confirmation, you may pull the Client Matter ID associated with the matter for your records.

Second, create any new matters in Unity. Three fields are required for creating a new matter:

  • name
  • matter_lead_email
  • matter_lead_is_approver

The following optional fields are also recommended when creating a new matter:

  • description
  • status
  • matter_group
  • open_date (if differing from the creation date)

View API Documenter for POST Create a Matter details.

Other Common Data Requests

Retrieve All Legal Entities

The entities are returned sorted by entity name alphabetically.

View API Documenter for GET List All Entities details.

Create New Legal Entities

One field is required for creating a new legal entity:

  • name

The following optional fields are also recommended when creating a new legal entity:

  • description
  • accounting_code

View API Documenter for  POST Create an Entity details.

Retrieve All Cost Codes

The cost codes are returned sorted by entity name alphabetically.

View API Documenter for GET List All Cost Codes details.

Create New Cost Codes

One field is required for creating a new cost code:

  • name

The following optional fields are also recommended when creating a new cost code:

  • description
  • accounting_code

View API Documenter for POST Create a Cost Code details.

List All Custom Attributes

The attributes are returned sorted by attribute name alphabetically. Attributes can only be filtered based on the ‘name’ field.

View API Documenter for GET List All Attributes details.

List All Custom Attribute List Values

Returns the list values for a specific custom attribute. The custom attribute id (e.g. attr_1234567890) is required to pull. The options are returned sorted by name alphabetically.

View API Documenter for GET Retrieve an Option for <list> Attribute details.

Create New Custom Attribute List Values

Creates a new list value for a custom attribute. The custom attribute id (e.g. attr_1234567890) is required to create.

The following fields are required for creating a new custom attribute list value:

  • name
  • description
  • accounting_code

View API Documenter for POST Create an Option for <list> Attribute details.

Update Existing Custom Attribute List Values

Updates an existing list value for a custom attribute. The custom attribute id (e.g. attr_1234567890) and the list value id (e.g. attr_opt_1234567890) is required to update.

The following optional fields are available to be updated:

  • name
  • description
  • accounting_code

View API Documenter for PATCH Update an Option for <list> Attribute details.

Retrieve Users

The users are returned sorted by created_date, with the most recently created user first.

View API Documenter for GET Retrieve All Users details.

Retrieve Audit Logs

The logs are returned sorted by created_date, with the most recently created log first.

Supported categories are:

  • added, edited, deleted, uploaded, downloaded, viewed, sent, escalated, exporte, updated, renamed, adjusted, approved, unapproved, rejected, unrejected, ‘requested changes on’, ‘resolved changes on’, paid, assigned, received, merged, split, activated, deactivated

Available modifiers can be added onto the end of a search string joined by a double dash and are generally shorthands for more advanced searches that can be done:

  • lt -> less than
  • lte -> less than equal to
  • gt -> greater than
  • gt -> greater than equal to
  • icontains -> contains, case insensitive
  • range -> two dates, everything between the dates matches (inclusive for the first, exclusive for second)

View API Documenter for GET Retrieve all logs details.

Retrieve Accruals for a Period

For a given period, retrieve all submitted accruals. The “period” argument is required to pull and must be in the YYYY-MM-DD format.

If a range of dates period can be specified with the range operator. For example, if only the accruals in the first three months are desired, the filter ?period__range=2018-01-31,2018-03-31 would display all relevant accruals. (Note that range is inclusive on both the beginning and the ending date)

View API Documenter for GET Retrieve Accruals for a Period details.

Common API Errors

Missing API key/token or Require new API key/token

  1. Contact your implementation manager or our Unity support team ([email protected]) to identify if you have an API user already configured and which environment the key is needed for (production or sandbox).
  2. Unity will either confirm a key exists or create a new key to send the key via personal email to a designated drop location.

What is the id/hash for this object?

  1. The id or hash for an object will be dependent on what call(s) your team is making. First, determine the call(s) and end points within the API Documenter.
  2. To obtain the id/hash for an object (e.g. a matter), retrieve all matters and locate the “id” key associated with that object. The hash follows a consistent format, where the first 3-4 characters represent the type of object (e.g., “mat” for matter), followed by an underscore (_) and the numerical ID. For instance, a matter hash could be represented as “mat_1234567890.”

API Call is Returning an Error

  1. Contact our Support Team ([email protected]) or your Implementation Manager (if you are still in Implementation). Provide the full call and response you are attempting.
  2. Our team will confirm if the object being called exists, and whether or not the API user has permission to see it.
  3. If GET, Unity can test the call to determine if we get the same error.
  4. If POST, Unity may test the call parameters in a demo environment.

API Call Returns No Results

  1. Log into Unity and verify that there is at least one object for the call (e.g. matters, vendors, etc) and verify the parameters of the call are applicable to the data within Unity.
  2. If the objects exist, this implies the API user has access to the database via API but does not have sufficient privileges to retrieve the data
  3. Customers can reach out to the implementation manager or Unity Support ([email protected]) team to verify which email address is associated with their API token.
  4. Unity will validate the user has a role which is sufficient in accessing the objects in question. API users should have a user role = “Administrative Role”.

Error Handling

In any integration process, encountering errors is a common scenario. Effective error handling is crucial to maintain the integrity and efficiency of the integration between Unity API and your corporate ERP system. Here are some best practices for monitoring and maintaining your system and errors that may arise:

Real Time Monitoring: Set up real-time monitoring and alerts for your API integration. This will enable immediate detection of errors as they occur.
Utilize logging systems to record detailed error information, which can be invaluable for troubleshooting.

Designated Response Team: Identify a designated response team within your organization. This team should include members who are well-versed in both the Unity API and your ERP system.

Notification Procedures: Establish a clear procedure for notifying the designated response team when an error is detected. This can be automated through your monitoring systems or manually initiated by the team monitoring the integration.

Root Cause Analysis: Once the immediate issue is resolved, conduct a thorough root cause analysis to understand why the error occurred. This step is crucial to prevent similar issues in the future. Document the findings and update your integration processes and error-handling protocols accordingly.

Continuous Improvement: Treat every error as a learning opportunity to improve your integration setup. Regularly review your error-handling procedures and update them as needed. Encourage open communication and feedback within the team regarding the handling of integration errors. This collaborative approach can lead to more resilient and reliable integration.

General Unity API Features and Q&A

What features can the Unity API support for each team or process?

FinanceLegal OpsReporting
Paying invoicesUpdating invoice payment status on Unity Pulling a specific invoices by created date, invoice date, modified date, or statusCreating and updating cost codesCreating and updating mattersCreating and updating most vendor dataCreating and updating custom attributesCreating and updating legal entitiesCreating, updating, and deactivating users including setting rolesAccess matters, invoices, vendors by created date, modified date, closed datesSearch and filter via statusesEasily pull all custom attributes associated with matters, vendors, invoices

What features are not supported by the Unity API?

  • Access to timekeepers data
  • Access to budgets data
  • Cannot access contacts or vendor contacts / CounselGO users
  • Cannot set permissions/teams via API
  • Cannot set invoice intake rules or approver escalation rules via API

What are the most common invoice attributes and their definitions?

While this varies per customer, below are some common attributes used to retrieve invoice details and pay an invoice:

Field NameDefinition
Invoice_dateInvoice Date on the header (defined by the vendor) 
Received_dateDate invoice was received into the Unity system
Invoice_numberThe number or name as listed on the invoice, the main invoice identifier
Entity.idEnt_123; unique identifier for legal entity
Cost_code.idCos_12345; unique identifier for the cost code
Custom_attributes.idAttr_opt_12345; unique identifier for custom attribute
Native_currencyThe currency the invoice was submitted in. (If null, the submitted currency is your base currency)
Native_totalThe amount the vendor billed (as well as final amount as adjustments cannot be made on international currencies) on the invoice in the submitted currency. 
TotalThe amount the vendor billed on the invoice in the base currency of your environment. 
Final_amountFinal amount of the invoice (after any adjustments) in the system/base currency. 
StatusE.g. “Approved”, ”Paid”
idUnity invoice reference number (e.g. inv_1234567890)
obj_idOn the invoice end point, this is the unique invoice id of the specific invoice, and is visible on the PDF and approver email

 Can PDF attachments come through the API

Yes. You can retrieve invoice attachments through Retrieve an Invoice. You can also pull the Unity generated PDF through either Retrieve an Invoice Detail PDF or Retrieve an Invoice Summary PDF.

View API Documenter for GET Retrieve an Invoice Detail PDF and GET Retrieve an Invoice Summary PDF details.

How do we know which invoices to pull from Unity to our finance system?

In a standard finance API integration, you will want to pull any invoiced in an “Approved” status. These are invoices that have been approved in Unity by all approvers and are ready for payment. As part of the API integration, you will want to update the status of the imported invoices to “Sent to AP” using PATCH. If the patch function isn’t available, you can also update the status using POST.

Is there anything else we can do with the API besides retrieve and update invoice information?

Yes. Through the API, you can access most components of Unity including matters, vendors, cost codes and legal entities. You can streamline your vendor intake process by pushing new vendors from your financial system into Unity. You can integrate with your patent software to push new patent & trademark matters into Unity. You can even use the API to update cost codes and legal entities.

Can you provide examples of how other partners have handled their integrations or technical references if we need additional help?            

Our Implementation team can offer guidance if you have specific questions on how to get started, but unfortunately, we do not share client data or integration specifics.

What are the valid invoice statuses in Unity?

  • Received
  • Rejected
  • Approved
  • Paid
  • Sent to AP
  • Posted to AP
  • On Hold

How can I see an export of all the sample JSon? 

You can download Postman and pull the full JSON export.

 For the ‘Update an Invoice’ API the documentation states either a PATCH or POST could be used. Is this also true for the ‘Create Payment for an Invoice’ or must a POST be used?

Payment information can only be posted right now, it cannot be patched. We treat it as a log so you can only add to it.

How long would it take our team to integrate with the Unity API and how will Unity help? 

This depends largely on the degree of integration in terms of what is required by the finance team, and the resources available on your development team to build it out. Unity can provide guidance in terms of understanding the documentation and in terms of what has been successful in the past. 

What is the difference between the Reference Number and Batch Number in the ‘Create a Payment for Invoice’ API? 

The reference number is unique per payment, whereas a batch number is used to group payments.

What is the difference between invoice_number and id and which should we use? 

The id is a unique number that Unity assigns to each invoice and should serve as its unique identifier. Invoice_number is the number associated on the invoice itself, but this is not always.

Can you accommodate custom object IDs in the API? 
Currently we cannot support customization in the object IDs. However, depending on business needs, we may have recommendations for different ways to proceed to achieve the same result. We also support custom attributes with our platform, which may aid in capturing the information you require. Reach out to your implementation manager for guidance. 

How do you recommend we update matters or vendors most efficiently?

For example, if your matter has 15 attributes and all attributes on a single matter need to be updated, that would be 15 calls. One method of reducing the number of calls is to check if the attribute values have changed. So instead of updating every single attribute value regardless if there was a change or not, you’ll want to validate if a change was made to the attribute value. Specifically, here is a step by step process recommendation:

  1. Obtain the id of the vendor/and or matter you wish to update
  2. Navigate to the attribute URL associated with that vendor/matter
  3. Check what attribute values are associated, ideally with the `page_size` value set equal to the `count` value
  4. Before deciding to update, compare the new value against the one seen on the page If different, then PUT, otherwise don’t PUT

Please note we do not recommend ‘page_size’ values over 100 as it may cause a timeout. 

How are foreign (non-USD) invoice adjustments handled in the API?

Unity currently does not allow adjustments on foreign invoices because it has tax implications for vendors in most countries. Since foreign vendors are required to submit tax data to their respective governments, any adjustments made to invoices would result in a mismatch in reporting numbers vs actual numbers for your vendors. Instead we require that foreign invoices requiring adjustment be rejected with comments so that vendors can re-submit with the required corrections.

How do you get the final invoice amount? 
There are three options to get the final amount depending on the currency used to bill.

Is there a limit on any of the APIs for how many results are fetched?

By default the maximum number of items on a paginated list page is 25. This can be configured by post fixing a URL with ?page_size=100 if a page size of 100 is desired but it may timeout depending on the endpoint you hit and how much data comes through.

Can a customer create a matter and assign matter attributes in a single API call, or is it necessary to create the matter first and then update the attributes separately?

The API does not support creating and assigning matter attributes in a single call. To accomplish this, you will need to make multiple API calls. First, create the matter, and then make separate API calls for each attribute update.

Additional Resources

Unity Support is here to assist with your team’s product questions. Contact our Support team ([email protected]) when you have technical questions, would like assistance with functionality, or answering ‘how,’ ‘what,’ or ‘where,’ within your products.  
Event Management Success Kit

At Onit, we recognize that effective event management is a critical part of successful matter management, and more broadly for  the efficiency of your entire legal department. Our innovative solution seamlessly integrates event tracking and management into our comprehensive matter management platform, to ensure you stay on top of key dates and deadlines related to your matters.

Here’s what you can expect with event management:

  • Centralized platform: A single place to see important events and dates in an easy list or calendar view for streamlined visibility with notifications to avoid missed deadlines.
  • Seamless integrations: Our one-way integrations with popular calendars like Outlook, Google, and Apple enable you to track events from your preferred platform. Our CalendarRules integration provides real-time-insight into comprehensive legal calendaring events, ensuring accuracy and compliance with court rules and procedures.

Additionally, here are some common uses for the event management feature that your legal department can leverage:

  1. Court Appearances: Schedule and track court dates, hearings, and other legal proceedings to ensure timely attendance and preparation.
  2. Depositions: Coordinate dates and times for depositions, including arranging for court reporters and notifying all parties involved.
  3. Mediation Sessions: Schedule mediation sessions and track their progress to facilitate dispute resolution.
  4. Internal Team Meetings: Schedule meetings for case reviews, strategy discussions, and other internal coordination efforts.
  5. Case Management Conferences: Schedule and manage case management conferences with the court to discuss case progress and timelines.
  6. Trial Dates: Organize and track trial dates, including pre-trial conferences and jury selection, to ensure effective case management.

Check out our event management resources to the right 👉 for more information!

How to get started:

Event management is only available for Unity matter management customers:

  • Event settings: For administration accounts, you can access Event settings under the tab Administration > Events to begin integration with CalendarRules and manage event types.
  • Access Events: Add, edit, and view events within each of your specific matters under Matters > All Matters > [specific matter name] > Events (located on the top bar next to Tasks) to get a detailed list and calendar view of all events related to your matter.

Invoice Validation Rules: Examples and Instructions

Welcome to Unity’s Invoice Validation Rules Examples and Instructions! You’ll find important information regarding the process, setup, and possible configuration of Unity’s Invoice Validation Rules.

Introduction

Billing guidelines can be complex. Unity’s Invoice Validation Rules Examples and Instructions can provide an overview of the common configuration and rules. Whether you want to implement basic rules or explore advanced strategies to enhance your existing processes, we’ve provided a list of ideas that you can easily build upon.

Please note: Invoice Validation Rules are unique to each environment. The provided examples and configurations may need to be adjusted to adhere to your needs and/or billing guidelines.

What are Invoice Validation Rules?

Invoice Validation Rules provide the ability to take action on incoming vendor invoices based on set fields within your environment. In laymen’s terms, they are comprised of an if/then scenario, meaning, if a set of conditions are met then an action will occur. Your team will be able to select the set of conditions and the subsequent action using our Invoice Validation Rules. 

For example, if the practice area on an invoice is Litigation and the invoice is over $10,000, then we will flag an invoice for review.


Training Options

Prior to building your rules, Unity recommends the following training modules to better understand how to use and maintain your rules


Invoice Validation Rules Basics

Basic maintenance of your rules to begin drafting and building your Invoice Validation Rules

Create a Rule

1. To get started, click Add Rule in the top-right corner of the rules list page. 

2. Title your rule. Enter information for the following fields:

  1. Name (required): Up to 150 characters allowed (including spaces)
  2. Category (required): Select an option from the dropdown list
  3. Description (optional): Useful for providing more context or instructions for other admins

3. Add a Condition. Conditions are statements that set which criteria must be met for the action to trigger. A rule can have one or multiple conditions depending on how broad or narrow the criteria. For example, a simple rule can have a condition that looks for and flags line items with specific expense codes. A more complex rule, on the other hand, can have multiple conditions to look for and adjust line items with specific expense codes that exceed a threshold. 

4. Add an Action. Click + Add Actions from the right side of the Rule Editor.

Select the action type (e.g., Flag Invoice, Add Activity Code, etc.). For more detailed information on supported actions, including how they are applied when a rule is triggered, review Rule Actions. Complete the additional required/optional fields for the action, such as entering a default comment. 

5. Save rule. Click Save Rule in the bottom-right corner. By default, this will store the rule as inactive, which is recommended for all new rules.


Clone an Existing Rule

Making a copy of an existing invoice validation rule is useful if:

  • You want to create a new rule by customizing an existing rule instead of starting from scratch.
  • You need to redo and replace a rule without impacting or deactivating the current version.
  • You want to save an existing rule as an inactive draft so it can be used as a template.

There are two ways to clone a rule:

Option 1: Click on the  (more) option from the rules list page and select Clone.

Option 2: Open the rule and select Clone from the  (more) menu in the top-right corner. 

This will take you to the cloned rule, which is automatically set to inactive. The Name field populates “(Clone)” followed by the original rule’s name. Make sure to customize the name and other fields. 

The remaining fields (i.e., Name, Description, and Category) and the conditions and actions are copied over from the original rule as-is.  Modify and/or add conditions and actions and then click Save rule in the bottom-right corner.


Edit an Existing Rule

Click on a rule name from the list page to open the Rule Editor. 

Alternatively, you can click on the  (more) option at the end of the row and select Edit.
From the Rule Editor, you can update the name, description, category, conditions, and/or actions. Click Save Rule in the bottom-right corner when finished.


Rule Actions
An overview of rule actions and their outcomes

ActionDescriptionExample Use Case
Flag InvoiceAdd a comment to an invoice record to describe a potential billing guideline violation before it lands in the review queue.If the total for an IP invoice exceeds $6000.00, then flag the whole invoice with a comment describing the billing guideline violation. 
Flag Line ItemAdd a comment and flag to a line item to describe a potential billing guideline violation before it lands in the review queue.If an invoice has Task Codes for administrative tasks that are not billable, then flag the line items and add a comment.  
Reject InvoiceReject an invoice before it lands in the review queue if it is unacceptable based on billing guidelines.If an invoice does not include a previously discussed vendor discount, then auto-reject the invoice. 
Adjust Line Item TotalAdjust the total for a line item to a selected amount before the invoice lands in the review queue.If an invoice for US provisional patents has a line item total that exceeds $6000.00, then auto-adjust the line total to $6000.00 per AFA. 
Adjust Line Item RateAdjust the rate for a service on a line item based on billing guidelines or vendor agreements before the invoice lands in the review queue.If an invoice for a litigation matter includes the keyword “discovery motion” for a line item description and the rate exceeds $400.00, then auto-adjust the line item rate to $400.00.
Add Activity CodeAssign an Activity Code to a line item before the invoice lands in the review queue.If an invoice includes the keyword “research” in the line item description but the Activity Code is empty, then set the Activity Code to A102. 
Add Expense CodeAssign an Expense Code to a line item before the invoice lands in the review queue.If an invoice includes the keyword “copy” or “copied” in the line item description but the Expense Code is empty, then set the Expense Code to COPY.
Add Task CodeAssign a Task Code to a line item before the invoice lands in the review queue.If the Matter Group for an invoice is Litigation and the line item description includes the keyword “deposition,” then set the Task Code to L330.


Common IVR Rules

Please note: Invoice Validation Rules are unique to each environment. The provided examples and configurations may need to be adjusted to adhere to your needs and/or billing guidelines.

Keywords and Phrases
Search for a specific keyword or phrase within an invoice

Scenario: Flag line items for keywords related to copies.
Configuration:

  1. After creating and labeling your rule, add conditions for Line Item – Description – Contains input necessary keyword.
  2. Using the “OR” parameter, add additional keywords Line Item Descriptions for keywords (e.g. copy, copies, scan, duplicate). 

Scenario: Flag invoice description for keywords related to resubmission.
Configuration:

  1. After creating and labeling your rule, add conditions for Invoice Subject – Contains input necessary keyword.
  2. Using the “OR” parameter, add additional keywords to review Invoice Description for keywords (e.g. resubmission, resubmit, resend). 

Scenario: Adjust a line item to “0” for copy expense codes.
Configuration:

  1. After creating and labeling your rule, add condition for Line Item Expense Code – Is one of and input applicable codes.
  2. Next, select the Adjust Line Item Total and set the threshold to the applicable value “0.”
  3. Populate the Vendor and Internal Comments with the message for both Unity users and CounselGO contacts.


Fees and Expenses
Validate for or against line item type

Scenario: Flag litigation line items that are missing expense line item type.
Configuration:

  1. After creating and labeling your rule, add condition for Practice Area – Is to validate against the matter’s practice area.
  2. Next, using the “AND” parameter, add condition for Line Item Type – Is not equal to for the applicable type “E.”

Scenario: Flag expense line items where the expense code is blank.
Configuration:

  1. After creating and labeling your rule, add condition for Line Item Type – Is for the applicable type “E.”
  2. Next, using the “AND” parameter, add condition for Line Item Expense Code – Is empty.

Positive and Negative Amounts
Search for positive and/or negative amounts

Scenario: Flag line items that contain keywords for “copy” and are more than “0.”
Configuration:

  1. After creating and labeling your rule, add conditions for Line Item – Description – Contains input necessary keyword.
  2. Using the “OR” parameter, add additional keywords Line Item Descriptions for keywords (e.g. copy, copies, scan, duplicate).
  3. Next, select “Add additional condition” of “AND” and add condition of Line Item Total – Is great than for the applicable value of “0.”

Scenario: Flag negative line items for a specific matter.
Configuration:

  1. After creating and labeling your rule, add condition for Matter id – Is to validate against a matter.
  2. Next, using the “AND” parameter, add condition for Line Item Total – Is less than for the applicable value of “0.”

Scenario: Flag negative line items for a specific matter.
Configuration:

Spend Limits
Validate a spend amount against Unity values

Scenario: Flag a total spend limit for a matter.
Configuration:

  1. After creating and labeling your rule, add condition for Spend – Is greater than and input your spend amount.
  2. Next, using the Add additional subparameters, add conditions for Matter.

Scenario: Flag an annual spend limit for a matter and vendor combination.
Configuration:

  1. After creating and labeling your rule, add condition for Annual Spend – Is greater than and input your spend amount.
  2. Next, using the Add additional subparameters, add conditions for Matter and Vendor.

Scenario: Flag a total spend limit for an activity code for a matter and vendor combination.
Configuration:

  1. After creating and labeling your rule, add condition for Spend – Is greater than and input your spend amount.
  2. Next, using the Add additional subparameters, add conditions for Matter, Vendor, and Activity Code.

Scenario: Flag a total spend limit for a designated start and end date for a matter and vendor combination.
Configuration:

  1. After creating and labeling your rule, add condition for Spend – Is greater than and input your spend amount.
  2. Next, using the Add additional subparameters, add conditions for MatterVendorStart Date, and End Date.

Expense, Task, and/or Activity Codes
Search for or validate against expense, task, and/or activity codes

Scenario: Flag an expense code for a specific vendor.
Configuration:

  1. After creating and labeling your rule, add condition Line Item Expense Code – Is and input your expense code.
  2. Next, using the “AND” parameter, add condition for Vendor id – Is for the applicable vendor.

Scenario: Flag multiple expense codes.
Configuration: 
After creating and labeling your rule, add condition for Line Item Expense Code – Is one of and input applicable codes (e.g. E107, E108, X112, X113).

Scenario: Flag for a specific code set.
Configuration: 
After creating and labeling your rule, add condition for Line Item Activity Code – Contains and input either the first letter of the code set (e.g. “L” or “A”) or the letter and number combination (e.g. “L3” or “B2”).

Scenario: Flag expense line items where the expense code is blank.
Configuration:

  1. After creating and labeling your rule, add condition for Line Item Type – Is for the applicable type “E.”
  2. Next, using the “AND” parameter, add condition for Line Item Expense Code – Is empty.

Validating Against Custom Attributes
Search for or validate against your Unity custom attributes

Scenario: Validate an invoice against a vendor Yes/No custom attribute.
Configuration: After creating and labeling your rule, add condition for Vendor – [Custom Attribute] and input applicable value (e.g. Yes/No, list value). Note: Any custom attribute type may be used (e.g. Yes/No, text, list, currency)

Scenario: Validate an invoice against a selected vendor currency.

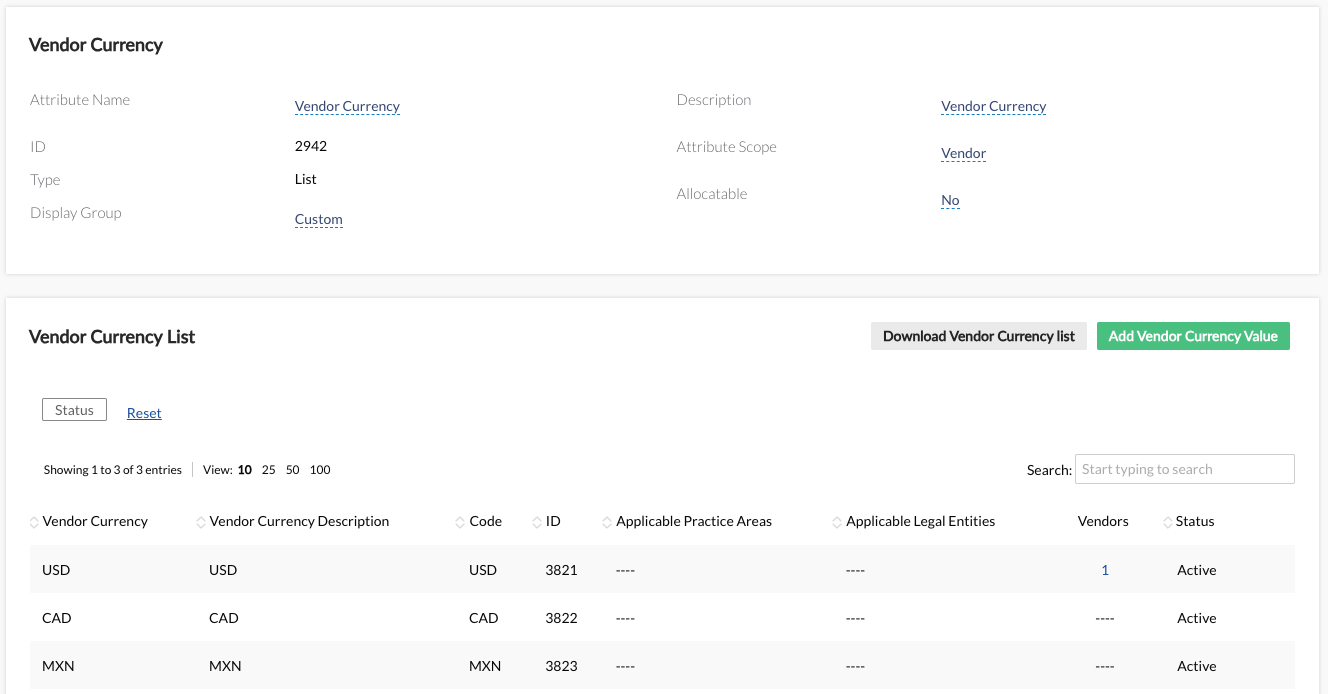
Configuration Step 1: Create a vendor currency custom attribute.

  1. Create a custom attribute labeled “Vendor Currency” or similar.
  2. Set the custom attribute as a “list” attribute and not allocatable
  3. Load any applicable currencies for your vendors in their 3-letter currency code (e.g. USD, CAD)

Configuration Step 2: Assign vendor currencies to vendors. Locate the vendors’ profile and assign the currency using the newly created custom attribute. Note: Unity’s bulk functionality can also be utilized. 

Configuration Step 3: 

  1. After creating and labeling your rule, add condition for Vendor – [Vendor Currency Custom Attribute – Is and input your first currency. Note: The currency must be the 3-letter currency code and match your custom attribute list value.
  2. Next, using the Add additional subparameters, add conditions for Invoice Currency – Is not equal to, and the 3-letter code from the step above.

Configuration Step 4: Clone your rule from Step 3 and update the values to the next currency value until all currencies are covered.

Scenario: Flag an invoice associated with multiple custom attribute list values.
Configuration: 
After creating and labeling your rule, add condition for Matter – [Customer Attribute] id – Is one of of and input applicable custom attribute values (e.g. Product A, Product B). Note: Any custom attribute type may be used (e.g. Yes/No, text, list, currency)


Flat Vendor Discounts
Validate against a set (1) vendor discount

Scenario: Validate a vendor discount.
Configuration:

  1. After creating and labeling your rule, add condition for Vendor id – Is and select your vendor.
  2. Next, using the “AND” parameter, add condition for Invoice Discount total – Is less than and input your vendor discount.

Scenario: Validate a vendor discount against a custom attribute. Note: This is typically reserved for Unity environment’s with a large volume of vendors with flat discounts. 10+ vendors with discounts is the threshold we typically encounter but is variable based on how your team decides to manage your discounts.
Configuration Step 1: Create a custom list attribute for the vendor discount rate (e.g. Vendor Flat Discount Rate) scoped to Vendors and create a list value for each discount rate to be applied to all vendors.

Configuration Step 2: Assign a discount rate to applicable vendors. 
Note: Unity bulk functionality can also be utilized.

Configuration Step 3:

  1. For each custom setting list value, create an IVR rule. After creating and labeling your rule, add condition for Vendor [Custom Attribute Name] id – Is and select the first list value.
  2. Next, using the “AND” parameter, add condition for Invoice Discount total – Is less than and input the rate associated with the selected list value discount.

Configuration Step 4: Clone your rule from Step 3

Configuration Step 5: Update the following rule values to the new discount rule.

  • Name
  • Description (if applicable)
  • Vendor [Custom Attribute Name] id
  • Invoice Discount total
  • Action Comment

Tiered Vendor Discounts
Validate against a set of (2+) discounts for a vendor

Scenario: Vendor ABC has three tiers of discounts with the following structure

  • Tier 1: 5% up to $10,000 annual spend
  • Tier 2: 10% up to $50,000 annual spend
  • Tier 3: 15% up to $100,000 annual spend

Configuration Step 1: Build your tier 1 threshold rule. Note: Multiple vendors can be assigned to tier rules if they share the same tier thresholds and rates.

  1. Create a rule for Tier 1, populate rule NameCategory, and Description. Recommended to name the rule with the Vendor Name and Tier 1 Discount and use the Discount category.
  2. Next, add a condition for Annual Spend – Is less than or equal to the tier 1 threshold (10000 USD)
  3. Then, using the Add additional subparameter select the vendor (Vendor ABC).
  4. Finally, using the “AND” parameter, add a condition for Invoice Discount total – Is less than and input the tier 1 discount rate (5%). It is recommended to input the tier and rate in the action comment.

Configuration Step 2: Clone your rule from Step 1.

Configuration Step 3: Update the following rule values to the new discount rule tier and rates.

  1. Name: Update to Tier 2 values (e.g. Vendor ABC Tier 2 Discount)
  2. Description (if applicable)
  3. Action Comment: Update to Tier 2 comment (e.g. Vendor ABC Tier 2 Discount of 10% is not met.)

Configuration Step 4: Build your tier 2 threshold rule.

  1. Create your lower tier and higher tier thresholds. Update condition Annual Spend – Is less than or equal to and input your tier 2 threshold (50000 USD).
  2. Using the “AND” parameter, add condition Annual Spend – Is greater than and input the tier 1 threshold (10000USD), this creates the tier 1 and tier 2 parameters.
  3. Lastly, adjust the Invoice Discount total – Is less than to the tier 2 discount rate (10%).

Configuration Step 5: Clone your rule from Step 4.

Configuration Step 6: Update the following rule values to the new discount rule tier and rates.

  1. Name: Update to Tier 3 values (e.g. Vendor ABC Tier 3 Discount)
  2. Description (if applicable)
  3. Action Comment: Update to Tier 3 comment (e.g. Vendor ABC Tier 3 Discount of 10% is not met.)

Configuration Step 7: Build your tier 3 threshold rule.

  1. Create your lower tier and higher tier thresholds. Update condition Annual Spend – Is less than or equal to and input your tier 3 threshold (100000 USD).
  2. Using the “AND” parameter, add condition Annual Spend – Is greater than and input the tier 2 threshold (50000 USD), this creates the tier 1 and tier 2 parameters.
  3. Lastly, adjust the Invoice Discount total – Is less than to the tier 3 discount rate (15%).

Configuration Step 8: Create additional Tiers by replicating Step 7 until all tier rules are created for the vendor.

Invoice Validation Rules (IVR) Success Kit

Unity Invoice Validation Rules (IVR) reduces your legal spend by enforcing your billing guidelines with vendors. IVR lets you set your own configurable rules to programmatically enforce complex alternative fee arrangements (AFAs), billing guidelines, vendor discounts, invoice approval routing, and more. It’s simple – validation rules automatically catch invoice violations according to the billing guidelines you set, saving you time in manual invoice reviews.

Implementing Invoice Validation Rules into your invoice review and approval process lets you take control of your e-Billing and spend management. Read on to learn how to start using IVR, or reference our additional resources on the right.

How to get started:

  • First, start by compiling your billing guidelines. Our recommended categories to place invoice guidelines on include: administrative, communication, copies, deliveries, overhead, research, subscription, and travel costs.
  • Create and implement your compiled invoice validation rules with any conditional values (under Administration > Rule Management). If you need help setting up rules, read through our linked Help Center articles for guidance.
    • Note: We have now added a new Category field. This will be used for our upcoming reporting around Adjustment Reasons. We suggest reviewing our default categories in the Invoice Settings area of Administration. You can deactivate existing values or add new ones that make the most sense for your business!
  • Check out our other available resources on the right – we recommend looking at the Best Practices whitepaper mentioned above and our list of standard default rules.
  • If you need further help configuring a rule, sign up for our Invoice Validation Rules office hour sessions! Our team is dedicated to supporting and guiding you through this process, so IVR can start working for you faster.

Need more help?

We hope this success kit helps guide you on how to use Invoice Validation Rules, maximizing efficiency in your invoice review process. If you have any further questions, please reference our other resources on the right-hand side of this page.  

Feel free to contact your CSM for any additional questions.

Legal Requests Success Kit

Implementing Legal Requests into your matter intake process standardizes the way you accept legal work requests and streamlines matter creation. Legal Requests allows legal and business users to request legal service through configurable forms, and gives admins the ability to choose which requests a matter should be opened for. Read on to learn how to start using Legal Requests, or reference additional resources on the right.

How to Activate and Implement

  1. First, you’ll need to reach out to our Customer Success team to get Legal Requests turned on in your environment.
  2. After activation, you will need to set up users with their own Unity login. If you have many Legal Requests users to create, there is also the option to leverage Single Sign-On (SSO) functionality.
    • Assigning a user the Legal Requests role only allows access to Unity to view and submit Legal Requests forms, nothing else.
  3. Legal Request forms need to be created. You can learn how to set up forms, manage requests, and more here.
    • Still need help? Reach out to our Customer Success team to walk you through recommendations and set up some basic forms.

Before you get started, check out some of our recommended best practices to use Legal Requests below!

Best Practices

Hold a training session with your team or organization

  • Make sure to cover what your requirements are to get a matter created. For example, specific date requirements, additional information to provide, or necessary attachments to include.
  • For new hires, be sure to include training on Legal Requests as well.

Enforce the usage of Legal Requests by only allowing matter intake through Legal Requests. Make it clear that no other methods will be accepted.

Encourage other team members to utilize Legal Requests by recognizing individuals who are doing a good job with submitting forms.

Keep all forms up-to-date with necessary questions. Also be open to taking suggestions and feedback from users on how the forms and process can be improved!